Wednesday, December 19, 2012

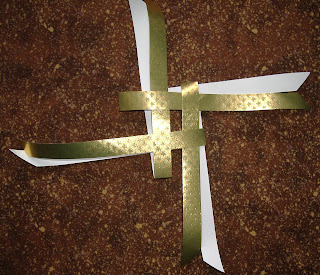
Folded Paper Star


Recently I was made aware of a blog that showed how to make a folded fabric star.  This reminded me of the paper stars I used to fold.  It has been SO long since I made one, I had to go back to my favorite craft book, which I received as a child, Wir Spielen und Basteln 

The best paper to use is metallic gift wrap with the color on one side and plain white on the other.  These instructions create a very small star – like about 2 inches square.  Increasing the size and length of strips will create a larger star.  Each step has the same numbered picture with it


1) Cut 4 strips of paper ½  inch by 14 inches (1.25 CM by 36 CM)  It doesn't hurt to cut the strips a little longer. Do this as accurately as possible.  Using a rotary cutter with an old blade is best. Fold each strip in half and trim the ends to a point.


2) Put the folded strips together into a basket weave by tucking the folded edge between the ends on the next strip.  The fourth strip will have to have its ends fed through the first loop.

3) On one side only, fold each successive strip straight across from its current position.  Again the last strip will have to be fed through the beginning pocket that was formed.  Snug this together into a nice square. (picture doesn’t show this).

 4) Making the star points:  Fold a strip diagonally under itself into a point.  Fold the strip diagonally on top and down to finish a triangle.  Fold the halves together towards the star middle.  Bend the point back so you can feed the end into the pocket at the point’s base.  Do this at all four corners.  Flip the star over and repeat with the strips on the other side.

 5)  Making the center cone points.  Take a strip end, turn it under at the center and around to outside, then feed the end into the pocket  90° of the beginning.  The color of the cone is the same as the other side of the star – so keep that color one top all the way around (note the arrow I drew to show how to turn this strip).  The end will come out of the star point.  You can use a pencil point to ensure you get a nice round cone. You may have to trim the strip width a bit, if it doesn’t want to slide easily – otherwise you may tear the strip. Do for all four strips and then turn the star over and repeat for those strips.

6)
Trim the ends flush with the star points.  Pull a thread through the fold of one of the star points and tie a loop for hanging.


Tuesday, November 13, 2012

Feathers Revisited


A little more than a year ago, I wrote about my desire to do feathers well.  I have been practicing them a lot and am improving, although I still have a ways to go.
Besides Daine Gaudynski and Sally Terry, I have added Peggy Holt to my favorite feather stitchers.  They each have a different take on how to make them and I think the more ways you know how, the more applications you can successfully manage.
To recap how I do feathers:
Most quilters will instruct you to feather all the way up one side of the spine and then the other.  I do both sides at once.  It eliminates backtracking or breaking thread and it lets you build the whole feather into the space at once.  I think you get a more balanced result, too.
I think the keys to good looking feathers are making elegantly longish tapered shapes and angling them fairly steeply to the spine.  I am finding that the base feathers establish how the rest of the feathers will look – so taking care to make them really well helps build the rest of the feather. If you look at what I did a year ago, those feathers tended to be stubby and round.  They lacked the elegant curve that I think looks so nice.
The photo below has each example marked with the corresponding number in this list.

1) I start by drawing a spine and stitching it from the top down, adding the base embellishment and ending where my first feather will start.  The “top” starts actually a short ways down from where I want to end.  Once I get back up there, I can decide how I will end the feather. 
2) For a traditional feather, after making the base feathers, I arch out and around, hook into the first feather, backtrack around the top of the feather and then hook back down to the spine.  I then repeat that on the other side of the feather.  The challenge with these is the backtracking and the fact you are making a pair each time – occasionally there are spacing problems.
3) To avoid backtracking you can make a hooked feather, as Sally Terry does.  Start with the same base feathers, then the next feather is slightly shorter – where it meets the previous feather you arch the second higher and away.  No backtracking, but you still are making pairs.
4) Dianne Gaudynski shows that it looks good to make each feather individually, but spacing them close together.  It’s that spacing that challenges me.  You can see where I wobbled mightily at the last.  I got distracted by something.
5) Here’s a completed traditional feather.
6) Finally there are Dream Feathers that Peggy Holt makes.  These start with a base shape.  You make a series of feathers arching away from and to one side of the base.  These get longer and longer, because you return to the starting point each time.  Then the back of the longest feather becomes the spine for the top row of the feathers.  Once those feathers get long, you return to the first side.  You end up with this fabulous undulating curve of feathers.  She shows how to use a variety of base shapes, but I like this simple curl best. 
7) Another feather application is the feather garland that I have devised (but it’s probably not original).  You make one feather with its inner edge towards the middle, make another feather facing it and bit longer.  When you arch around and hit the first feather, make the third feather facing the same way as the first – and so on.  This works really well in narrow borders and sashing.

While Dream Feathers are ideal for borders, when arranged symmetrically, you can fill any shape with them.  For today’s practice I decided to try making a block of Dream Feathers. 

  I started out by marking the boundaries of the area I wanted to quilt as well as the initial base shape.  I also ended up marking the central rosette (not in the photo).
   
The feathers themselves are freehand.  While they don’t exactly match up with the others, the overall effect is one of symmetry and movement.
  I liked the result so much (in spite of my wobbles) that I bound it and hung it up in my studio!

Saturday, November 10, 2012

Striped Hearts


The two blocks this tutorial describes
 Recently I was on the hunt for a heart block made with strip sets.  I found one very nice one, but unfortunately there were huge inconsistencies in the measurements given in the blog.  I am not going to criticize someone’s efforts, so I decided to redo the instructions to hopefully help people create consistently sized blocks that are fat quarter friendly.
1) For the strip set
·       Select 9 fabrics – these can be values of one color, a mixture of colors, whatever.
·       Arrange them in the order you want to sew them together.

·       Cut strips 2 through 8: one inch wide and about 21 inches long.
·       Cut strips 1 and 9:  1 1/8 inch, but also 21 inches long.

2) Sew the strips together using an accurate ¼ inch seam.  Measure as you go to ensure that you are using a true ¼ inch seam.  Press seams open as you do. When finished your strip set should measure 5.25 inches.


3) Trim the left end of your strip set perpendicular to the seams.  Now cut your strip set into four 5 inch wide units.  You should have a little bit of strip set left over, depending on how much you had to cut off of the left end.


4) Now square each unit to 5 inches: hopefully you will only be trimming a bit from the end strips.
5) Lay out the four squares into a larger square with the strip direction alternating.

 
6) From the background fabric cut two 5 inch squares and four 2 inch squares.
  • Mark the diagonal on the wrong side of each background square.
  •  Place each background square right side down on the strip squares as shown in the picture.  Notice that I have marked which side will be trimmed – this will make sure, especially on the lower quarter blocks that you don’t trim the wrong side.  I did that!
 
·       
  •  Sew along each drawn diagonal.  Trim each outer triangle to a ¼ inch seam allowance.  Press seams open.

7) Sew the top half of the heart together, making sure to line up the center diagonal seams to form a crisp notch where the heart lobes meet.
8) Sew the bottom half together, matching the diagonal seams to form a crisp tip.
9) Sew the 2 halves together. Matching the center seams.
10) Trim the block to 9.5 inches.  Make sure you leave ¼ inch of background past the bottom heart tip.


11) From the background or border fabric
  • Cut 2 strips that are 9.5 inches long and at least 2 inches wide.  I cut mine 2 1/8 inches wide to have a little extra for squaring up my final block.
  • Cut 2 strips that are at least 2 inches wide and 12.5+ inches long. (Since I had cut my border strips 2 1/8 inches wide, the longer strips were cut 12.75 inches long.)
12) Sew the short strips to the top and bottom of the heart, the long strips to the sides.  Press seams to the border side.  I recommend that the strip side be on top so allowances don’t flip over and you can clearly see where to sew to not chop off the lower tip.
13) Trim the block to 12.5 inches square.


Variations:  these are just 2 of probably many ways to vary this.


1) If you don’t want to use strips or are in a hurry, consider using a striped fabric.  I had some nice red fabric that I used.
  • Cut the striped fabric into 5 inch squares and then proceed from Step 5 above to create the block.


2) If you don’t want all your hearts standing straight up and down, cut your borders 1 inch wider than directed.  After sewing on the borders, tilt your 12.5 inch ruler (or create a 12.5 inch paper template) to cut the block.  When sewn together, the hearts will be tilted but the blocks themselves are square.  Vary the direction of the tilt.  You could even combine an assortment of tilted and untilted blocks. The picture below shows an example of a quilt I am making with tilted Dresden plate flowers.  These blocks are 17 inches, so I made a paper template to determine where to trim the blocks.  The raw blocks were 19 inches before trimming.

Thursday, November 1, 2012

Explorations with batting and stitch lengths


I have been quilting a quilt for my daughter.  I warm up on the large practice quilt before I switch over to hers.  I have also been digging through Diane Gaudynski’s blog posts.  She is another quilter (besides Leah Day and Ann Fahl) I admire and who quilts beautifully on a domestic machine.  She doesn’t write many posts, but there’s a lot of good info to glean from them.
She and others have extolled the virtues of wool batting, especially if you want certain sections of your pattern to pop without needing trapunto.  So I made two identical 10 inch square sandwiches, one filled with the cotton batting I usually use and the other with wool.  I practiced various ways to quilt feathers and then filled between them.  Yes, indeed there’s a huge difference.  Wool is expensive, but if it’s an art quilt or a very special quilt, I think it is worth it.  If you watch sales and collect coupons, it’s actually not too hard to get it at a more affordable price.
Cotton batting on the left and wool on the right.

Close up of the swatch using wool batting.

Another thing I have been grappling with is stitch length.  If hand stitching, smaller is better, like 20 stitches per inch.  So you would think that would also be a guideline for machine quilting.  Leah thinks it doesn’t matter, so long as it is even.  One source says 10 to 12 stitches per inch, and Diane uses as many as 15 to 20 stitches per inch.  She recommended taking a swatch of fabric and sewing lines at different lengths, so you could see what it would look like.
Sample of stitch lengths - stitches per inch are in ()

Obviously, if you are doing really fine, tight patterns, a smaller stitch is needed, but what about bigger quilts with more open, larger patterns?  After looking at some of mine, I found that I tend to hit about  8 to10 stitches per inch.  However, some of my swirls weren’t as sharp or smooth as they should be.  Some sections had much longer stitches than that. I know I probably need to aim for more like 12 to 15 stitches per inch.  That means slowing down my hands and maybe speeding the machine up a bit.  What I have noticed is that I accelerate my hands in the curves (like I do when I am skiing or driving) which makes those stitches very much longer.  So I need to maintain a consistent and slower, more relaxed speed in my hands.  I also noticed that I get ahead of the machine and then my needle tings. I probably am bending it a little, which is released when the needle leaves the fabric, thus the ting.
Today I worked on those things today: slightly shorter stitches and more consistent speed to get even stitches.  It felt better and the results showed it was.  I had almost no tinging.  Progress!